

I started writing this back in November and left it as a draft for a while. Since so many of my friends have jumped on the Thanksgiving in Spring wagon, I decided to brush it up and post it now.
This past holiday we had a cool 44lbs of turkey, for 20-something guests, at two different dinners with a full array of traditional sides and desserts. Then, I cooked another 26lbs recently just for fun.
That’s 70lbs of turkey in four months, for those keeping track.
My husband really, really, loves Thanksgiving food.
Get a Turkey
I went intentionally overboard with the size of bird the first time, because I fully intended to feed a shit ton of people with it. This time, I got the size of turkey that my InstaCart shopper was able to get and that’s pretty much that. I will warn that at a certain point the size can become an issue for finding a place to brine, the interior of your oven, the space in your largest pan, and just the sheer weight and girth of a frozen bird that’s pushing 30lbs. I would suggest going through the process twice with two smaller birds. BUT, if you have the equipment for it, a giant one does look pretty fucking dramatic.
You’ll actually need 1 to 1-1/2 pounds per guest, a 12 pound bird for an 8 person dinner. After the first 16 pounds or so more of the weight is going to be meat versus skeleton.
Before you start, rewind 72 hours and make sure your turkey is fully thawed. I used one fresh never-frozen bird and one premium Butterball with little difference so far as I can tell. Clear your fridge out for this and thaw it covered in it’s intended baking dish or use a cooler to prevent the outer surface area of the bird from rotting while the inside is thawing.
Don’t just leave it in the sink or on the counter. That shit is gross.
On that note, be extra mindful of your kitchen cross-contamination while you’re lugging, flopping, splashing this raw poultry around. Know what surface you’re going to before you make any sudden moves with it. You should be washing your hands every 4 minutes and 27 seconds anyways.
Brine
I’m not sure if there are two camps on this step, but if there is there shouldn’t be. You do absolutely have to brine your turkey. Here’s a video of Alton Brown explaining the science behind it.
Bring to a boil
- 1 cup kosher salt
- 1 gallon vegetable or chicken stock
- 1/2 cup light brown sugar
- 1 tbsp black peppercorns
- 1 1/2 tbsp allspice berries
- Ice cubes to cool brine
I used honey instead of brown sugar this last time. (At the beginning of this video Alton says that basting does nothing for the flavor of the meat, but I think the butter does help to brown the skin nicely.)
Dump ice in the brine to cool it. Place the bird inside of a clean plastic trash bag, and then inside of a large insulated cooler filled with a shallow layer of ice. Fill the bag with (cooled) brine and tie it up.
Leave for 48 hours.
Remove from brine and lay out on a large cookie sheet to dry.
Rub & Stuff
I don’t suggest cooking stuffing inside of a turkey. Not just because food safety experts suggest you not do it, for reasons of temperature regulation. Stuffing is about texture, which is finicky, and leaving it inside that bird definitely isn’t the best way to perfect it. It also doesn’t do anything to add to the flavor. Make stuffing on the side, about an hour prior to carving, and bake it briefly in a casserole dish while the turkey rests. Trust me.
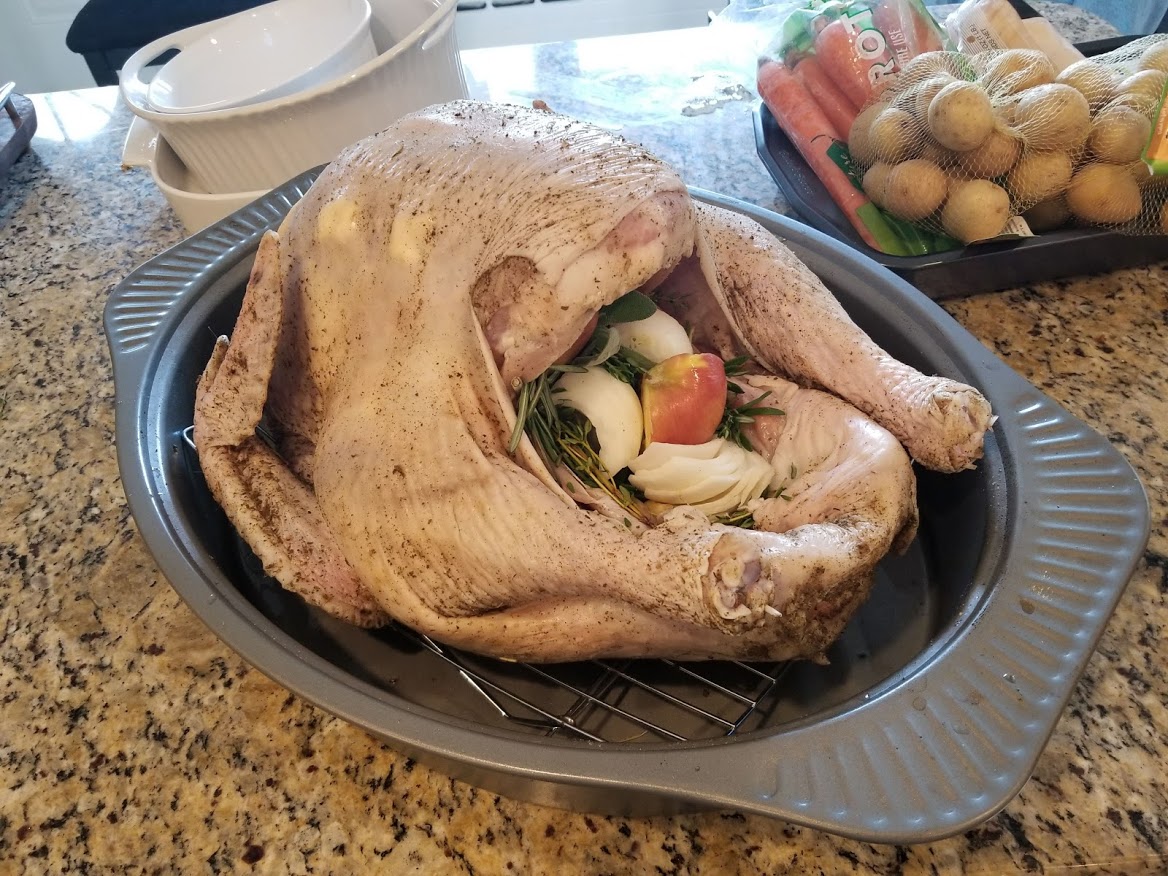
Do STUFF the turkey with aromatics
- 1/2 bunch thyme
- 1/2 bunch sage
- 1/2 bunch rosemary
- 1/2 onion
- 1/2 apple
And, make a rub mixture
- 1 stick softened butter
- 1 tbsp dry poultry mix seasoning
Rub half the butter mixture onto the turkey outside of the turkey. Then lift the skin at the edges and use your fingers to make a pocket for rubbing underneath.
Tying
Sometimes, your bird will come with the legs already pinned together with a plastic ring. If it doesn’t have one, or you’d like to truss (that is, tie) the wings with twine instead of tuck them into the skin, you can watch another Alton Brown video on how to shibari it up.
Smaller turkeys and chickens (this can all be done with a chicken) may not need to be entirely covered with tinfoil, and will brown, but will need to have their wing tips protected from burning. You can either cover the tips in tinfoil, tuck them underneath the bird, or make a 1/2″ slit into the skin behind each and tuck the tip into it.
This is also a good time to shape tinfoil to fit the bird for use later, when it will be hot and hard to handle.
I sometimes add a rack to the bottom of the pan to let the bottom of the turkey crisp.
Timing
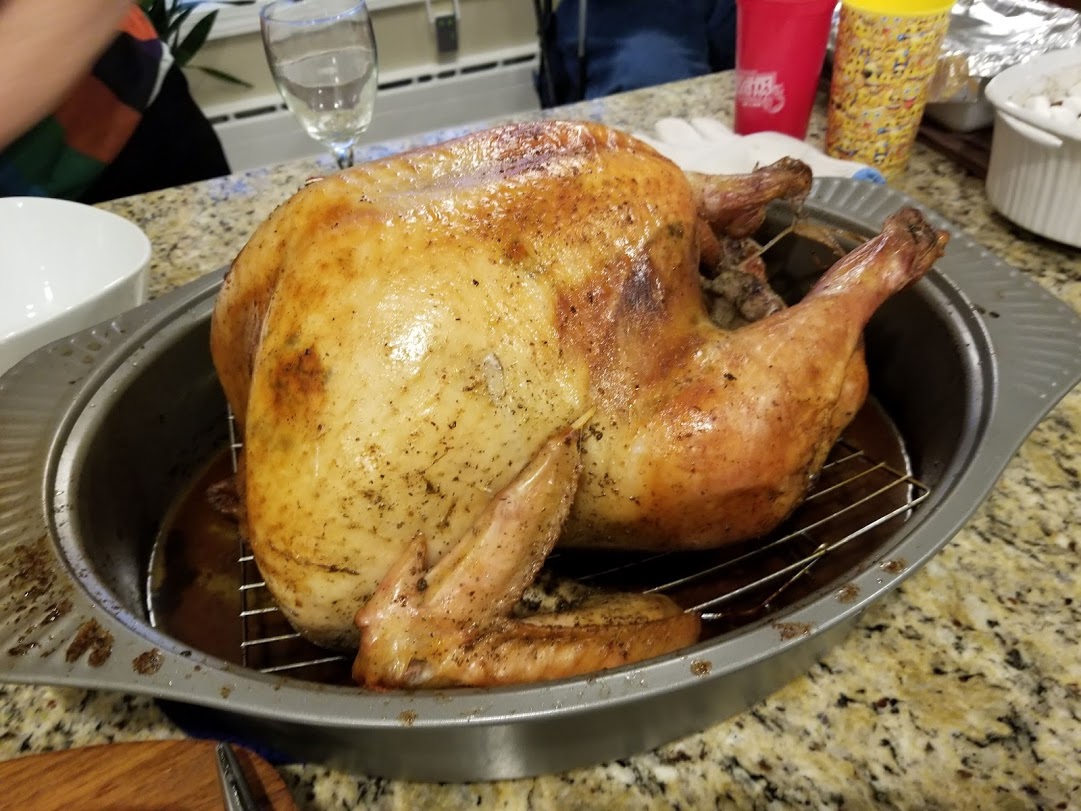
Start the oven at 500 degrees, cook for 30 minutes uncovered, and then reduce the heat to 350 for the duration of cooking and cover larger birds with foil.
Roasting should take 15 minutes per pound, 3 hour for a 12 pound bird. After the first 16 pounds or so that will drop to just a few extra minutes per pound – just use a thermometer.
You really do need to use a digital thermometer in the deepest part of the meat on each side, deep as you can without touching the bone. You aren’t going to fucking guess when it’s 170 degrees. Those pop-up timers are horseshit. The one in the link has a 40″ metal wire that connects the probe to the monitor, so you can leave it in the meat and read the temp on the counter. It also has temp alarms built in for each kind of meat, and a regular timer. I have a handheld one but I’m buying this one myself for Mother’s Day.
Your white meat needs to reach 160 degrees, your legs need to be 170.
As I mentioned, I do baste the turkey a few times during the last half hour of cooking. I think the butter bath helps to brown and crisp the skin. If it’s getting too brown, cover the body (with the foil from earlier) while the legs continue to cook.
When handling hot tinfoil, a super heavy pan, heavy duty oven gloves are advised. Be mindful that they don’t work if wet. An optional pro touch, a baster made of heat resistant silicone and stainless steel that wont melt when it touches the sides of the pan.
Remove from oven and let rest uncovered for 15 minutes or so.
Gravy
You can make gravy in about 5 of the 15 minutes your turkey is going to rest.
Skim any large pieces of herbs, fat or skin from the bottom of your roasting pan. Use a metal whisk to break the drippings up and make them a more homogeneous oily liquid. Transfer two cups of this into a saucepan and use the whisk to stir it while it simmers. Use a mesh sieve to add cornstarch and whisk continuously until it disappears. If you skip the sieve tiny clumps of starch will form, and it’s going to probably look like shit, but it wont taste much different. Try to sprinkle evenly by tapping the handle of the spoon with your finger instead of shaking it.
Let it cool for 10 minutes to set up.
You can double this process if you have more drippings and want excesses of gravy.
Carve
There really is a proper carving board for this, it has grooves to hold juices, spikes to secure the meat, sturdy handles to carry it from one counter to another. I can’t find a prime example of this online right now, mine belonged to my mother-in-law. I did find one that seems good sans handles.
A long, sharp, relatively thin knife is perfect for maneuvering around it. If you search for a carving knife you’ll come up with a rounded tip and pointed tip option, the latter is going to be the guy you want.
Make sure that you have a platter large enough or make two, one for light and dark meat. There is a good chance that you’re not going to need all of the it for one meal, unless you’ve really stretched your guest-to-pound ratio, so only take the time to cut as much as you’ll need.
If that doesn’t feel romantic, and you have the quintessential Americana image of a father carving a turkey at the beautifully set table, know that is probably not going to ever be a reality for you. Actual carving can be a little messy and require turning the bird this way and that. Even if you were doing a professional job of it, it doesn’t exactly make a good centerpiece afterwards. It’s big as shit, and if you’re already fitting extra chairs around a table you likely want room for plates and side dishes instead.
Rather than transcribe the physical task, watch Alton Brown Carving A Turkey

Speaking of great turkey photos, that quintessential image we all think of is the Rockwell oil painting Freedom from Want, originally published in the March 6, 1943 issue of The Saturday Evening Post. It was third in a four part series based on what became known as the Four Freedoms speech given by president Roosevelt during a State of the Union in January 1941.

Freedom from Want, Freedom from Fear
The third is freedom from want—which, translated into world terms, means economic understandings which will secure to every nation a healthy peacetime life for its inhabitants—everywhere in the world.
– Franklin D. Roosevelt
It was later incorporated into the preamble of the United Nations Universal Declaration of Human Rights.
Patriotic Thanksgiving table trivia.
Store Leftovers
If you didn’t entirely carve the bird before dinner, carve off all of the random pieces of meat left. I cut one breast into 3″ long strips for fajitas, chopped the rest into 1/2-1″ pieces and put dark (thigh/leg) meat and white together into a container. This works for everything else I make with it.
Wrap the turkey in tinfoil and forget about that shit in the fridge for a couple of days. Not as a matter of technique, you just probably aren’t going to want to do this all right now. Don’t leave leftover bird in the fridge for more than a few days, though. When you come back to it, lay the tinfoil out on the counter and pick all of the bits of meat off the bone, turning the bird around to thoroughly get all of the crevices, discard fat and tendon pieces. Use these bits in a turkey pot pie or a turkey casserole, where uniform pieces aren’t an issue.
Depending on how you’re planning to use it later, you want to freeze it already cut and ready. Put pieces into an appropriate sized ziploc and lay flat on a cookie sheet. Once it’s frozen solid it can be stacked flat or upright on it’s side like a book. I can’t show you a good photo of this at the moment, because our freezer right now looks like… well, like it’s the apocalypse. (More about storing things for the apocalypse coming in a subsequent posts.)
Another option is to prepare some Thanksgiving Remix Recipes in the first few days and freeze them for up to 6 months in individual serving containers for lunches. (My husband’s preferred method.)
Bone Broth
Hopefully, you saved the tops/skins of onions, tops/ends of carrots, bottoms/tips of celery when you were preparing stuffing earlier. I keep a bag in the freezer to collect them always, because I make broth every time I cook something with a bone in it. Alexander has me make miso with it and drinks it for lunch, which is good for his skin and bones, and the sodium helps raise his low blood pressure.
Place the naked birdy body into a pot along with 2 tablespoons of salt and a handful of leftover aromatics – rosemary, thyme and sage. Top with water, bring to a boil and then simmer for several hours, stirring occasionally to break up the bones as they fall apart. Add water if the level drops below 3/4 full.
It will smell like Thanksgiving all over again. All day. Maybe the next morning, too. I assume you’re into that sort of thing.
After you’ve boiled it to death, use a slotted spoon, sieve with a handle, or a steel basket strainer to remove the large pieces of bird and vegetable. Let them cool in a big bowl before throwing them out so that you don’t melt your garbage bag. Also, if you have dogs, don’t let them get sideways with it because cooked bones splinter.
Put a colander over a glass or metal bowl and pour the remaining broth and bits through it. If you want to have a very clear broth, rinse the colander, line it with cheesecloth, and run the broth through again to remove particulates.
Store your broth bowl in the fridge for two hours, then remove and skim the layer of fat that has gathered across the top. It’ll still have plenty of fat you’ll miss, if you skip this step you’re going to have a very oily soup.
If you want to use all parts of the bird in entirety you can save this fat for cooking your leftover meals. Melt the fat before storing in an airtight container in the fridge so that any remaining impurities sink to the bottom of the container, leaving clean fat on top.
If you want to be next level, using EVERY SINGLE part of the bird, you can bake the cleaned bones at 450 degrees for an hour and then use a strong blender to turn them into bone meal for fertilizing carrots, onions, beets and flowers. I haven’t done this to these past few birds, but I have done it in the past with chicken bones. Some of the large drumstick bones might be a bitch to break apart.
You’ve got the time though, right?
- Roasting pan
- Twine, if necessary
- Oven gloves
- Mesh sieve
- Carving board
- Carving knife
- Meat thermometer
- Insulated cooler and plastic bag, or fridge space
- Tinfoil
- Baster, or large spoon
- Turkey
- Thyme
- Sage
- Rosemary
- Yellow Onion
- 1/2 apple
- Powdered poultry seasoning
- 1 stick butter, softened
- 1 cup kosher salt
- 1/2 cup light brown sugar
- 1 gallon vegetable or chicken stock
- 1 tbsp black peppercorns
- 1 1/2 tbsp allspice berries
- Ice cubes to cool brine
- Cornstarch
Optional for Broth
- Colander
- Slotted spoon
- Cheesecloth
- Carrot pieces
- Onion skins and ends
- Celery bottoms and tips
- Leftover thyme
- Leftover sage
- Leftover rosemary
- 2 tbsp salt